Hokkaido toast
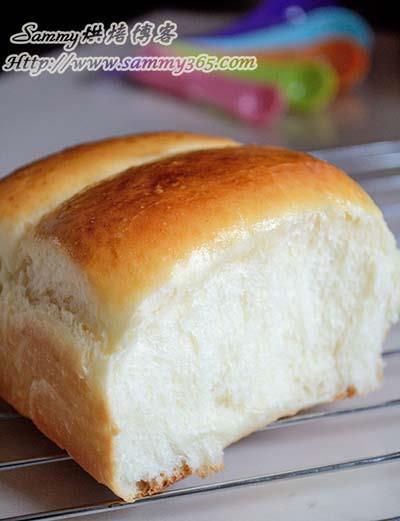
WHAT YOU NEED
Ingredients
A moderate amount of flour200 grams of high-quality flour80 grams of cream60 grams of milk15 grams of whole eggs8 grams of fine sugar2 grams of dry yeastModeration of the main group40 grams of fine sugar20 grams of whole egg juice5 grams of butter3 grams of salt1 g of dry yeast
How TO MADE Hokkaido toast
Steps 1 to 4
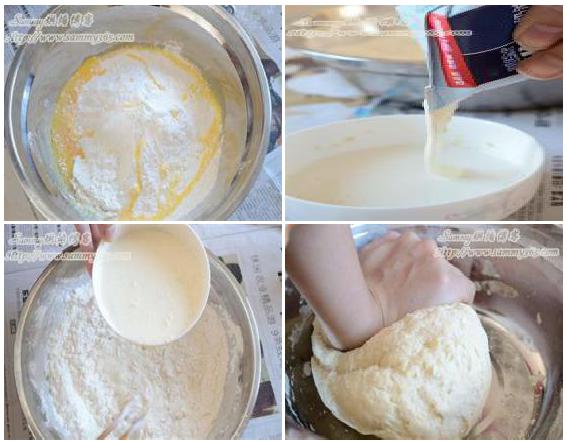
1. The ingredients needed for the dough are weighed one by one, then the flour, white sugar and egg juice are poured together and stirred evenly.
2. Dissolve the yeast in warm milk, then pour the butter into the milk and stir evenly with a chopstick.
3. The good milk paste will be slowly poured into the flour, and then stirred with a chopstick.
4. After all the milk has been poured, if the flour is still very dry, you can add a little water, and then you can knead the dough by hand.
Steps 5 to 8
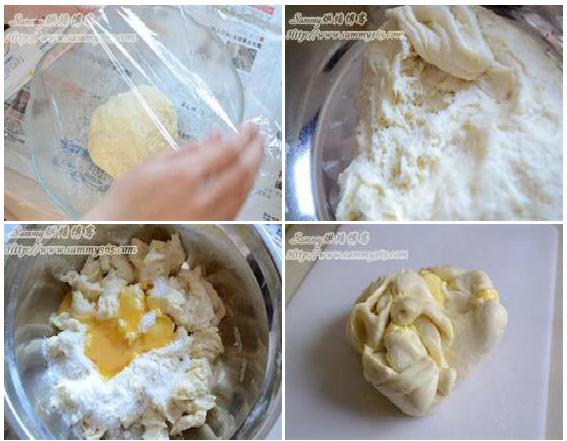
5. At this point, the dough is basically ready, and we put it in a container, cover it with a preservative, and refrigerate it for more than 12 hours!
6. The next day, we take the dough out of the refrigerator, and by this time the dough should have fermented to two or three times its original size, and the internal tissue should be in a more loose state.
7. Tear the dough into small pieces, pour all the ingredients listed in the main dough (except butter) into the bowl, and then mix by hand.
8. The surface of the dough begins to become smooth and no longer sticky with constant rubbing. This process takes about 5 to 10 minutes, at which time it can be removed and put on the board, then add butter and continue rubbing.
Steps 9 to 12
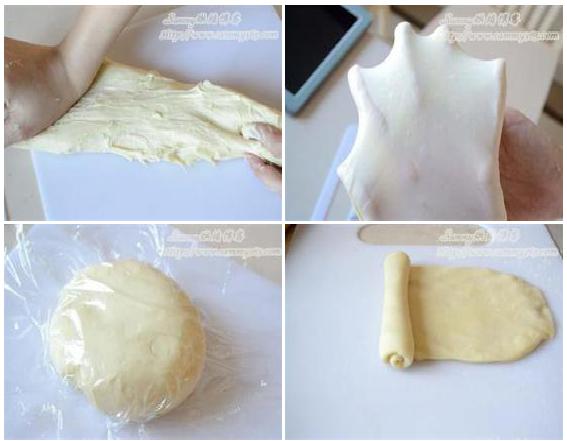
9. In the case of the board, we use a stretch method (the longer the better), which allows the dough to come out faster, and if the technique is skilled, in 10 minutes the dough can be pulled out of the state of the glove membrane.
10. This step is the key to success, the bread must be kneaded in place, and the finished product will be as soft as a cloud, pulling out a beautiful bread thread.
11. The dough in place can be pulled out of a very thin, very thin film, even if it covers the entire palm without breaking the hole, this is called the glove film.
12. Of course, we don't completely pursue the glove film, as long as your dough can be pulled very thin, even if there are only one or two holes, and for a smooth and neat round hole around, such dough can also make a very soft bread.
Steps 13 to 16
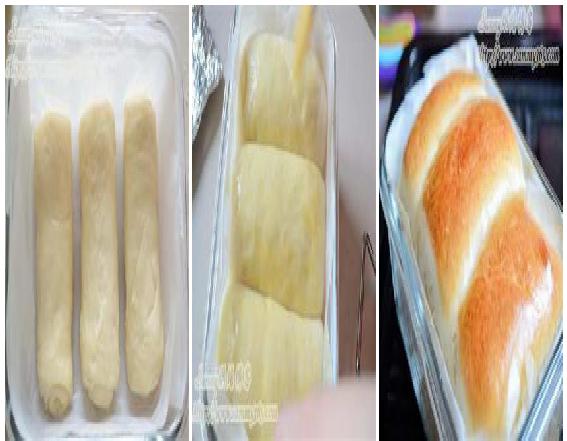
13. At this point, we cover the mashed dough with a preservative film, leave it on the side and relax for 15 minutes, and rest for a while.
14. The loose dough is divided into three equal round balls, each of which grows into a square plate (not too thin), which is then rolled up by hand and placed in a glass vessel with pre-covered oil paper (leaving enough space in the middle), so that the toast is finished.
15. Then we prepare a bowl of hot water, put it in the microwave (or oven), put the toast in the microwave, close the oven door.
16. A second fermentation takes about two hours.
17. We can take a break again. (Note that there is no need to connect the microwave or the oven.)
18. After 2 hours, the toast has been fermented to twice its original size, basically to the size of the mold by 8.9 percent.
19. At this point, we use a brush to brush a layer of egg on top of the toast, put it in a preheated oven, and start baking.
20. The temperature is set to 160 degrees, the time is set to 20 minutes, and when the surface of the bread is colored (about 10 minutes), a layer of tin paper can be applied to the top of the bread, to prevent the phenomenon of baking paste from occurring because the surface is raised and the heating tube is too close to the top of the bread.
21. After 20 minutes, the house is filled with fragrance, and the Hokkaido milk toast is ready! The soft taste of the clouds, the sweet smell of the milk, and the beautiful silk are perfect!
Handy cooking tips
Sammy advises: After the mid-season production is completed, it is important to have water when kneading the main dough, do not stick to the recipe completely, you can add a little water to the dough with your fingers at any time during the kneading process to keep the dough moist and soft.The softer the dough, the better the taste of the bread, and the harder the bread.2. If there is a lot of moisture, the dough will be sticky, so when you touch the water with your fingers, you should touch it a little, otherwise the dough will be too wet, which will increase the load on the surface.The temperature and humidity of the yeast fermentation are very important, especially when fermenting twice, so using hot water in the microwave oven, one can increase the humidity in the oven, and the other can maintain a higher temperature in the oven, so that the yeast reaches maximum activity, so that the fermented dough tissue will be more loose and soft.4. This medium-temperature method better retains the moisture of the dough and has a stronger blistering effect.Of course, this doesn't make our arms too tired in two days, but the successful bread is very soft in texture, and when it's opened, you'll find that the inner structure is very beautiful, and you can pull out long bread threads.You'll know when you try it.
REACTION RECIPES
- Cute chewing gum cream cookies
- A bowl of cranberries
- Margaret's cookies
- Christmas cookies
- Grapefruit cookies
- Sweet potato biscuits
- Sugar cream cartoon cookies
- Egg whites
- Mothers and Daughters in the Galaxy
- Two-colored checkered cookies
- A small snack for the World Cup - a bite
- Margaret's little cookie
- Cranberry cookies
- Eggs and cookies
- How to make an ultra-simple cranberry cookie
MOST POPULAR RECIPES
- Black sesame flavored rice cake
- Honey cake that everyone eats
- Traditional Bordeaux curry canelé
- Cakes and pastries
- Honey cocoa cake
- The practice of w date cake
- Walnut cakes
- Strawberry cream cake
- A small cherry cake
- Chocolate cheese cake
- Cappuccino and cocoa cake
- It's a lovely chocolate cake.
- Honey cake
- Christmas cakes
- Sponge cake

 DESSERTS
  BAKING
  MAIN DISHES
  SNACKS
  CHINESE FOOD
  HOME
HOME