Soft and soft bread
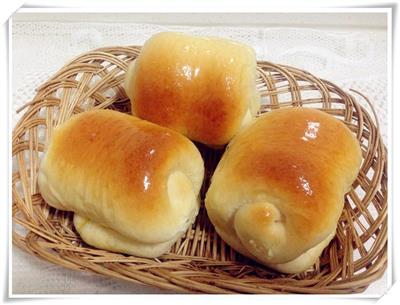
Bread is a popular staple food, and homemade soft, sweet bread with a cup of milk or soy milk can be a healthy and delicious breakfast.But making your own bread is also a very endurance-testing thing, because it has to go through two fermentations of the dough, the middle stirring, the final baking, and it has to wait until it dries before it can be eaten.At the same time, due to the limitations of the capacity of the household oven, a small plate of bread can be baked for half a day, and if there are more people in the family, it can be eaten for breakfast, and it seems that the payment and the harvest are not equal.But there's also the fun of making bread, especially the fun of kneading it by hand, and watching this plain, unusual flour change in your hands, and the process of kneading it, and the fermentation, and the fermentation, and the fermentation, and the fermentation, and the fermentation, and the fermentation, and the fermentation.If you're not afraid to put in the effort and time, you can try this small bread, which is very soft, 400 grams of flour, and is also suitable for manual kneading.
WHAT YOU NEED
Ingredients
High-quality flour 400Milk powder 30White sugar 40Eggs 60Water 200High-sugar yeast 5Butter and oil 15
How TO MADE Soft and soft bread
Steps 1 to 4
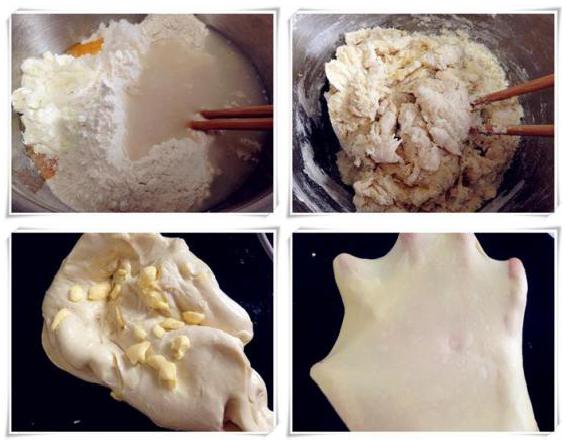
1. Put the ingredients other than the butter in a clean bowl. (Note: Do not let the salt touch the yeast while adding the ingredients. The yeast can be opened with a bowl and water and then poured into the kneading bowl. Also, because the flour absorbs water differently, it is recommended to leave 10 g of water first.
2. Use a pair of chopsticks to turn the material in the bowl for about two minutes. (Note: This method allows you to temporarily keep your hands away from the flour. After stirring, you will see if the moisture is suitable. If necessary, you can continue to add a little water.
3. After stirring, the dough is poured onto the board and rubbed, as if rubbing clothes on a scrubbing board, so that the dough forms a membrane as soon as possible. When the dough is smooth and tough, add softened butter and continue rubbing;
4. Until you get rid of this membrane, you can pull out a small piece of dough, and you can pull out a very thin membrane that doesn't break, and that's it.
Steps 5 to 8
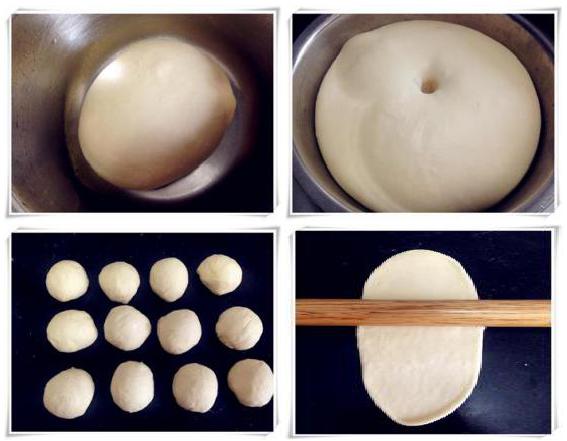
5. (Note: It took me about 15 minutes.)
6. Place the finished dough back in the bowl, cover it with a preservative film, and place it in a warm place for fermentation.
7. The dough is fermented to twice its size, and the hole is punched by hand, so it doesn't shrink or collapse.
8. After aeration, the fermented dough is evenly divided into 12 small doughs (about 60 g each), kneaded, covered with a preservative film and stirred for 15 minutes;
Steps 9 to 12
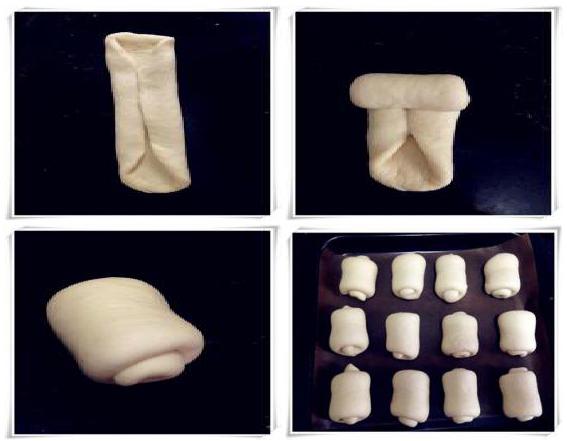
9. Remove one of the loose dough, press the flat exhaust, and use the dough stick to grow the bar;
10. Both sides fold inward;
11. From top to bottom;
12. Wrapped in a small roll of bread;
Steps 13 to 16
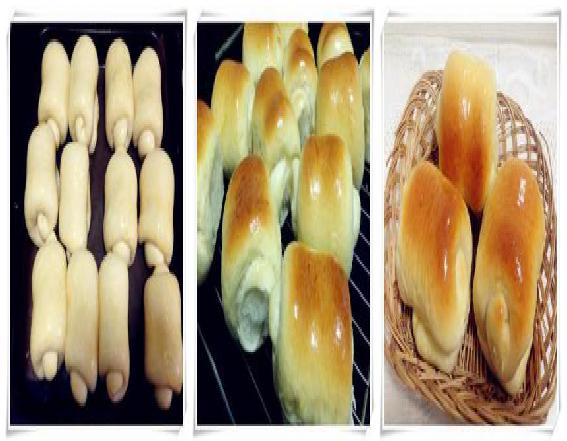
13. In turn, the 12 are rolled into the oven, the oven is covered with oil paper or tin paper, leaving a gap in between, and then placed in a warm, moist place for a second fermentation to double the size. (Note: if you do not cover the oven with oil paper or tin paper, the oven is also coated with a layer of butter or cooking oil to prevent sticking; the second fermentation can be done in the oven, put the baking tray with the bread dough in the middle or upper layer, put an oven filled with hot water in the bottom layer, close the oven door without turning on the electricity.)
14. If you don't have a spare grill, you can also use a grill net to put a plate of hot water on the net; also remember to wipe the water vapor in the oven after fermentation.
15. My plate is not in order, I roll a piece after the second one, but in this case try not to touch it, brush all the liquid on the surface;
16. Oven 180 degrees preheated, up and down fire, medium layer, about 18 minutes.
17. After removing the baked bread, brush a layer of corn oil, so that the bread is shiny and can retain moisture well, and then put it on the baking net to dry. (Note: Regarding preheating, my method is that when the heating tube slowly turns red and slowly turns dark, it is preheated, and you do not necessarily have to brush corn oil, you can not brush it, but it is not so bright, you can change it to other oil)
18. Please note: Do not eat bread that has just come out of the oven, because during the fermentation of the dough, a certain amount of lactic acid bacteria and acetic acid bacteria are produced inside, which can cause excess stomach acid and cause stomach disease, so wait for the bread to cool naturally before eating.
19. In addition, after the bread has cooled, please seal it with a bag, it can be stored at room temperature for 2 to 3 days, it can also be stored in the refrigerator freezer, when eating it can be taken out and cooked in the oven for a few minutes.
20. Don't put it in the refrigerator, it will age the bread and affect the taste.
21.
Handy cooking tips
This bread is soft and well made, it doesn't need a lot of molding, and if you find it difficult to roll, you can also make it into a small round, or use your favorite molding method, which is also very good.
REACTION RECIPES
MOST POPULAR RECIPES
- The black gallon cake
- It's like a sugar-coated handmade cookie.
- Cookies and biscuits
- Oatmeal and cranberry crackers
- Tea and biscuits
- The bear cookie.
- Cranberry cookies
- Greek coconut
- Peanut butter and cookies
- Sweet cream biscuits
- The witch's finger cookies
- Margaret, please.
- Corn on the cob energy bar
- Cranberry cookies
- Sea turtle meat

 DESSERTS
  BAKING
  MAIN DISHES
  SNACKS
  CHINESE FOOD
  HOME
HOME