 DESSERTS
  BAKING
  MAIN DISHES
  SNACKS
  CHINESE FOOD
  HOME
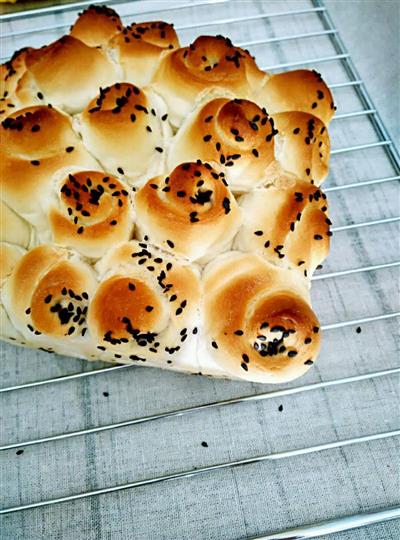
HOMELittle flower bread
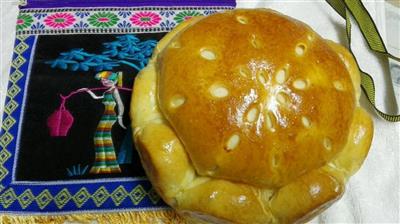
The idea of this little flower hat was inspired by the reticulated bread, seeing many friends cutting the reticulated bread with a sharp knife, I thought it was not worth buying a knife, I couldn't cut it myself, and then I thought it made sense to cut it like everyone else, in the process of designing the pattern, I got a lot of inspiration, in fact I can cut it into all kinds of flowers, even animals, today I cut a simple little flower hat!
WHAT YOU NEED
Ingredients
80 grams of soup220 grams of high-quality flour44 grams of eggWater 32 grams30 grams of butter3 grams of yeast2.5 grams of salt30 grams of white sugar
How TO MADE Little flower bread
Steps 1 to 4
1. First make the soup, 20 grams of flour and 100 grams of water mixed together, put it in the milk pot and heat it on a small fire, theoretically it is to keep it around 75 ° C to paste, I usually, based on experience, one hand pot, one hand slowly stirring, keep the pot from the fire 3 centimeters, so as not to boil, see the dough gradually paste, become like the dough we used before, it can be said to paste dough.
2. The estimated back-and-forth process is no more than six minutes.
3. This is a picture of the transfer from the pot to the storage box.
4. The finished product weighs about 107 grams.
Steps 5 to 8

5. I put the soup in the fridge for two hours and then use it, and I usually use it overnight.
6. Take 80 grams of soup and all the other ingredients except butter and mix them together into a roughly formed dough, put in the refrigerator and refrigerate for half an hour so that the dough absorbs enough water.
7. I'm gradually adding butter, so the film comes out faster, not your usual post-oil method.
8. In short, it's okay to go to this stage of expansion, because what you're going to do is make a beautiful bread, you don't need to go to the full stage.
Steps 9 to 12
9. After kneading, I put the dough in one of my usual preservation boxes, so that I can observe the height after fermentation to make it easier to judge the fermentation effect, cover it with a wet cloth and put it in a sealed container for basic fermentation.
10. After about 2.5 hours, the dough is spread to 2.5 times the original size, the dough is lightly pressed with water by hand, there will be a small hole, neither collapsing further down, nor obviously bouncing back, it is almost the same, this is also based on experience.
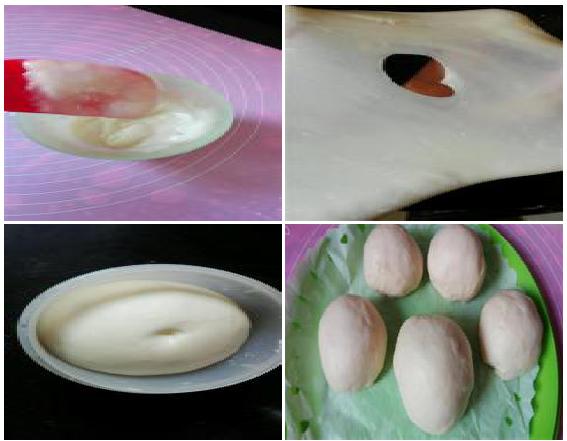
11. A well-fermented dough, gently squeezed with the palm of the hand, weighs about 420 grams in total, then divided into four 64 grams of dough and one 164 grams of large dough, so that the surface of the dough is as tight as possible to keep smooth, the mouth facing down.
12. Put in a sealed container and relax for 40 minutes, if the relaxation time is not enough, the following preparation will make the dough shrink and not be handled well.
Steps 13 to 16
13. Take a good 60 grams of small dough, open it into a circle with a diameter of about 13 cm, spread the jam evenly on it, and the rest of the meat and the beans are in line.
14. Don't wipe it around, just squeeze out the bubbles on the edge.
15. At this point, prepare an eight-inch mold and cut a piece of baking paper the same size as the bottom of the mold.
16. Cut a second piece of the same size and cover it with the first piece of jam and squeeze it slightly.
17. Apply the jam again, apply the third skin again, keep the same size, press tightly, and put together in the center of the baking paper.
18. Take the fourth small piece of dough, grow 18 cm of elliptical slices, squeeze the bubbles, try to make them as flat as possible, this is the dough.
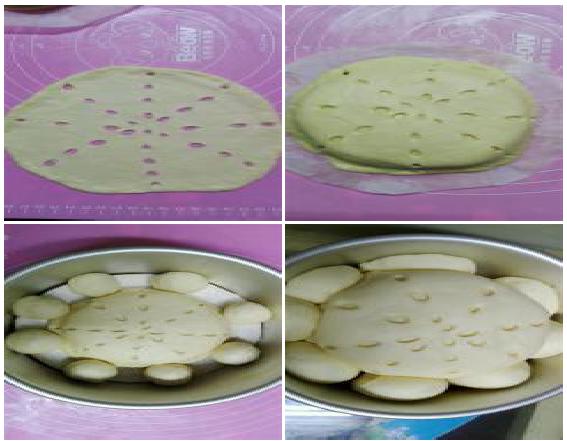
19. Using a one-centimeter-wide engraving knife or other small knife, cut into four straight lines (as in the picture, the central three are slightly closer together, because the next step is to pull horizontally, with an equal distance between each knife.
20. The cut sheet is pulled apart to the left and right at both ends, drawn into a circle with a diameter of 14 to 15 centimeters, so that the original thin and tall rice sheet becomes an eight-leafed sheet, the sheet is thinner than the first three pieces, trying to make it as smooth as possible.
21. The top of the eight-leafed cap is evenly covered on the jam embryos made in front, completely wrapped, and the rest is extended to the four corners, pressing the edge of the cap tightly on the baking paper.
22. Put it in an eight-inch mold, and apply butter evenly to the inner wall of the mold, preventing it from sticking.
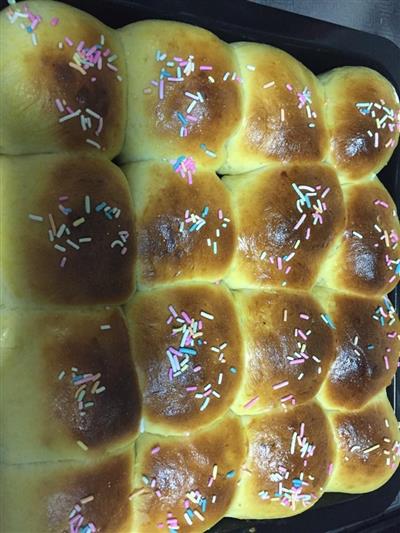
23. The remaining 164 grams of dough, divided on average into 8 small round balls, are placed around the corresponding capsules, as evenly spaced as possible.
24. The second fermentation is done in a sealed container, and a glass of warm water can be added to the sealed container to help the fermentation.
25. For about two more hours, (depending on the specific temperature and humidity and other conditions) observe the fermentation state, the volume can expand twice as much as the original, then press with your hand from an invisible place, it is elastic like the skin of a doll, if it shrinks once, it is over, no elasticity is even worse, preferably not over, so check carefully.
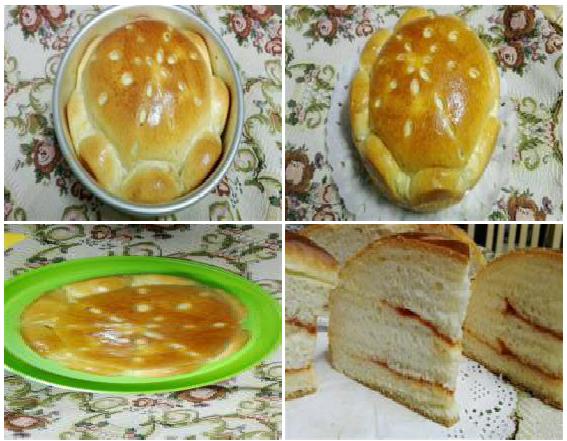
26. Preheat the oven, brush the egg yolk at the same time, do not brush the egg yolk to the pattern of the inner layer.
27. My oven is 155 degrees Celsius, it's good to bake for 15 minutes, each oven knows for itself, bake until satisfied, my oven has a high heat, I usually turn off the fire first, then bake for 5 minutes with low heat.
28. This is a good aftertaste.
29. A piece of cloth, like a hat?
30. It feels like a flower.
31. Cut it open and take a close-up, like a cake?
Handy cooking tips
The soup is actually very simple to make, and if you take this step, you won't want to eat the straight bread you used to make.The biggest benefit of soup bread is that it is as soft as the next day, no worse than the bread in the bakery, we all know that the bread in the bakery is modified, for the needs of the family, let's do it ourselves!


REACTION RECIPES
- Chocolate lava cake
- This is the first time I've been able to do this.
- The original Fennel brick cake
- The Apple Muffin
- The taste of cake.
- No burden - cocoa tofu cake
- Miracle cake
- Eggs, cakes and cookies
- Sweet and sour yogurt cake
- Scottish classic - cheese and onions
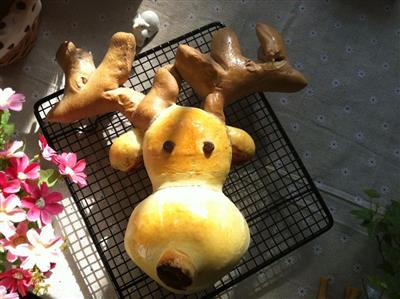
- Cartoon animal cake
- A super simple and healthy sweet corn cake
- This is a very simple muffin cake.
- Flower cake
- I'm going to make you a cake.
MOST POPULAR RECIPES
- Colorful roast beef pizza
- It's delicious to eat.
- The double pizza.
- Pizza with black pepper and bacon
- Pure meat pizza
- The mini-thin rainbow
- Tomato pizza with ham and potatoes
- Handmade pizzas
- Beef pizza with a bottom
- Pizzas in the Shimmer style
- This is a mini pizza.
- The square pizza
- Bacon and onion pizza
- Simple pizzas made by hand
- Sweet potato pizza