 DESSERTS
  BAKING
  MAIN DISHES
  SNACKS
  CHINESE FOOD
  HOME
HOMERed velvet cake
After experiencing a red velvet cake roll, I made the famous red velvet cake today, and after tasting it, I found out that it was supposed to be called red velvet cake.
WHAT YOU NEED
Ingredients
One egg (cake body)10 grams of red cake flourButter (cake body) 60 gramsFine sugar (cake body) 150 grams10 grams of cocoa powderYoghurt (cake body) 120 ml150 grams of low-fat flour (cake body)1/2 teaspoon of salt (cake body)1/2 teaspoon of baking soda1 teaspoon of lemon juice (cake body)A few drops of herb (cake body)500 grams of whipped cream
How TO MADE Red velvet cake
Steps 1 to 4
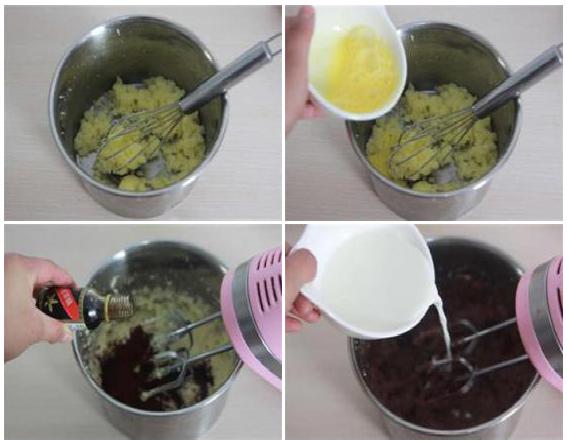
1. Butter softened at room temperature, added fine sugar, stirred smoothly
2. Add the egg juice gradually and continue stirring until the butter and eggs are fully emulsified.
3. Add the lemon juice and stir evenly.
4. Add the yogurt gradually and stir evenly, and the butter will be thinner and more liquid.
Steps 5 to 8
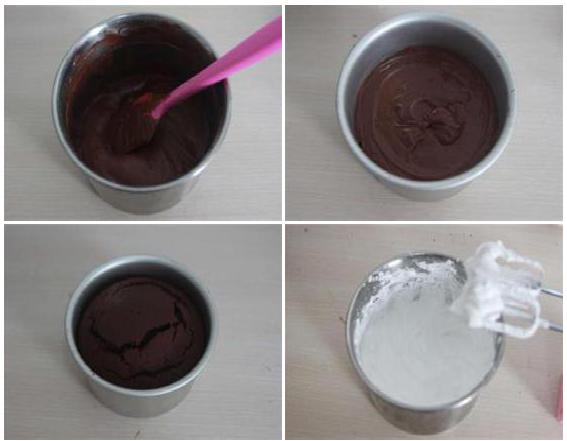
5. Flour, cocoa powder, salt, and baking soda are mixed in butter and mixed with a scraper.
6. The mixed cake paste is poured into the mold and shaken slightly.
7. After shaking, put it in a preheated 180-degree oven, bake for 30-35 minutes, insert with a toothpick, if no particles are brought out, the cake is baked, baked and then removed from the mold for backup
8. Light cream is sent to moist foam with an electric egg beater
Steps 9 to 12
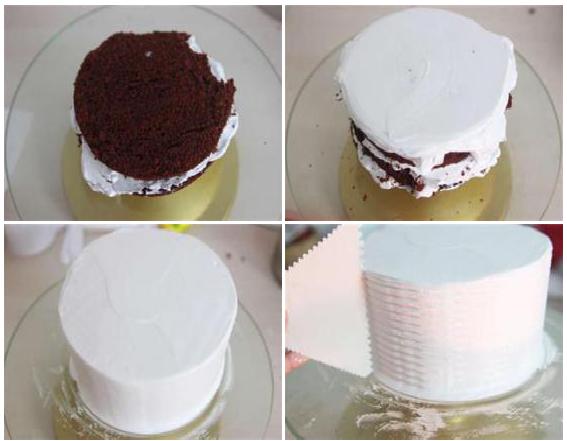
9. Cake slices, which can be divided into two layers or one layer.
10. Put some cream on each layer and smooth it slightly.
11. First put a thick layer of cream on top of the cake, then use a knife, pointing the knife to the center of the cake, slowly rotate the turntable, slowly flattening the top of the cake
12. Then apply the cream to the sides, put the knife perpendicular to the side of the cake, then turn the turntable, apply the knife still, and flatten the sides.
Steps 13 to 16
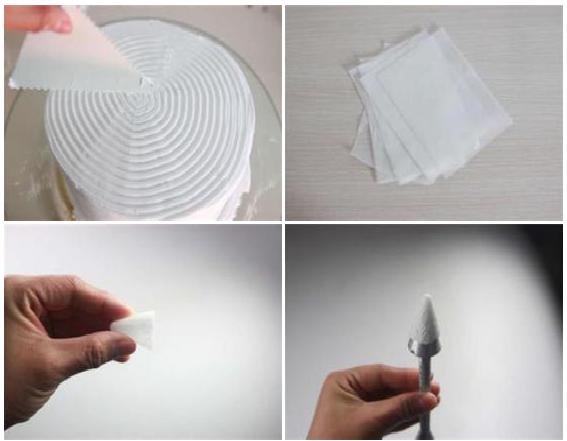
13. After smoothing the cake, use a triangular scraper along the side, perpendicular to the side of the cake, rotate the turntable, draw the pattern
14. Then use a triangular scraper to continue drawing the pattern on the top.
15. When it's fully cooked, put the cake in the refrigerator.
16. Add the remaining light cream and continue to boil until hard.
Steps 17 to 20
17. Cut the oil paper into 5 x 5 cm square sheets
18. Cut about 1 cm with scissors.
19. Put the meatballs on the needle.
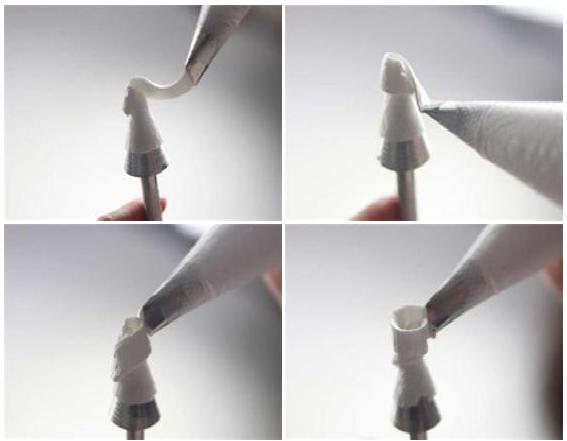
20. Insert the little rose petal from the 3 point position of the glutinous mitre, and then pull out a
Steps 21 to 24
21. The flower needle in the left hand turns one and a half times, the right hand cooperates left and right, and after circling a flower bud, it finally falls in the seven-point position of the flower needle
22. The rosette is then inserted from the opposite side of the end of the inflorescence, and the inflorescence is 0.1 cm higher than the inflorescence, the inflorescence is 90 degrees vertical to the inflorescence, the left hand rotates the inflorescence needle
23. Right hand evenly squeezes out the petals, turns around, right hand no longer uses force
24. "The third piece is inserted from the opposite side of the previous piece, with the mouth slightly lower than the previous piece, about 0.1 cm."
Steps 25 to 28
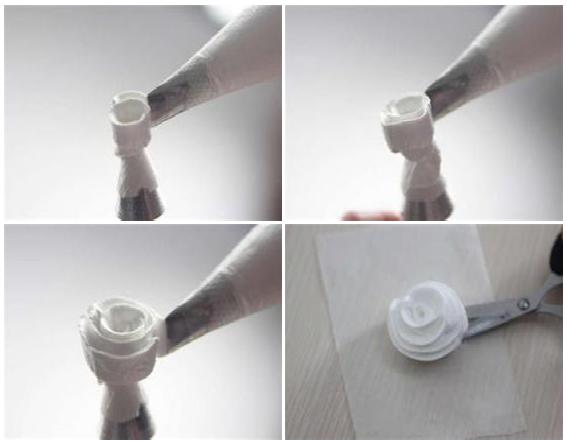
25. Continue to rotate the needle, with the right hand, and squeeze out the petals.
26. Following the above method, each subsequent petal is 0.1 cm lower than the previous one.
27. Squeeze four or five pieces, the roses are ready, the roses are cut with scissors, and put on the oil paper that was cut before.
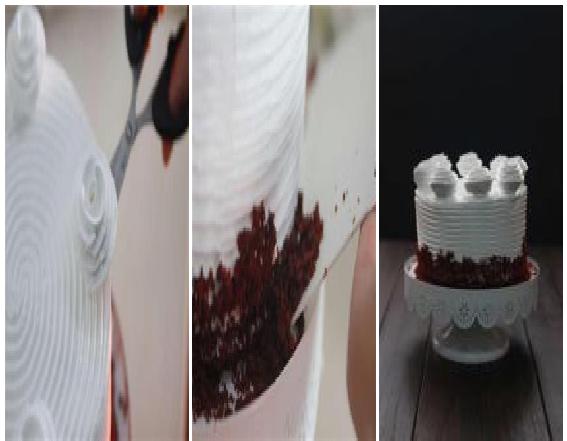
28. After everything is done, put the roses in the fridge and freeze for five minutes, and the frozen roses will not bloom easily.
29. The cake is moved to the tray with a knife, and then carefully placed on the cake with scissors.
30. Finally, the remaining cake crumbs are wrapped around the bottom of the cake with a scraper.
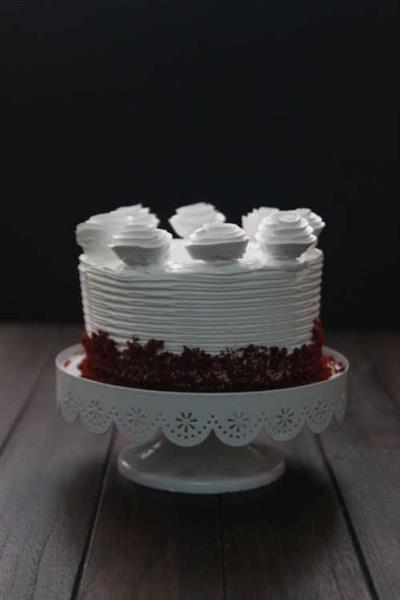
31. The beautiful red velvet cake is ready.
Handy cooking tips
Note: The cake baked from the recipe is loose in texture, and when slicing the cake, be as careful as possible, if it is broken it does not matter, you can use cream to glue it.2, after the cake is unmoulded, there will be some cake crumbs, don't throw them away, it's a really good choice for decoration.The rose blossoms in the recipe are Japanese-style roses, which are more attractive, but are more difficult to make, requiring more practice.There are many kinds of fillings, you can use cheese cream, you can also use cream.The surface of the cake will have cracks when it's baked, but that's okay, because when it's baked, you can put the cracked side at the bottom.

REACTION RECIPES
- Apple pie
- What is the name of the city?
- Portuguese eggs
- A compulsory lesson for beginners in baking - milk cakes
- Super soft cake rolls small four rolls
- Dried dates
- Oranges and cookies
- Dried apple pound cake
- A small cake with whipped cream
- Roasted eggs
- Three eggs and two delicacies
- Carrot cake
- Orange and coconut in the spring
- Chocolate yogurt and cheese mousse cake
- Strawberry shortcake
MOST POPULAR RECIPES
- Oil-free walnut bread
- Corn flour honey yogurt bread
- Golden rolls of mashed potatoes
- Coconut wheat bread
- Small round white bread
- Meat loaf rolls
- Cabbage bread
- Christmas wreaths
- A bag of maple syrup
- Butter and cream bread
- Hot dog rolls
- Tofu bread
- High-quality dairy bread
- Yoghurt flowers again
- Electric rice and coconut bread
RECIPE TAGS:
-
One egg (cake body)10 grams of red cake flourButter (cake body) 60 gramsFine sugar (cake body) 150 grams10 grams of cocoa powderYoghurt (cake body) 120 ml150 grams of low-fat flour (cake body)1/2 teaspoon of salt (cake body)1/2 teaspoon of baking soda1 teaspoon of lemon juice (cake body)A few drops of herb (cake body)500 grams of whipped cream